What to Do With an Old PC: 12 Home Server Projects That Actually Matter
Turn an old PC into useful local-first infrastructure for storage, media, Home Assistant, cameras, backups, Docker, DNS, and monitoring.
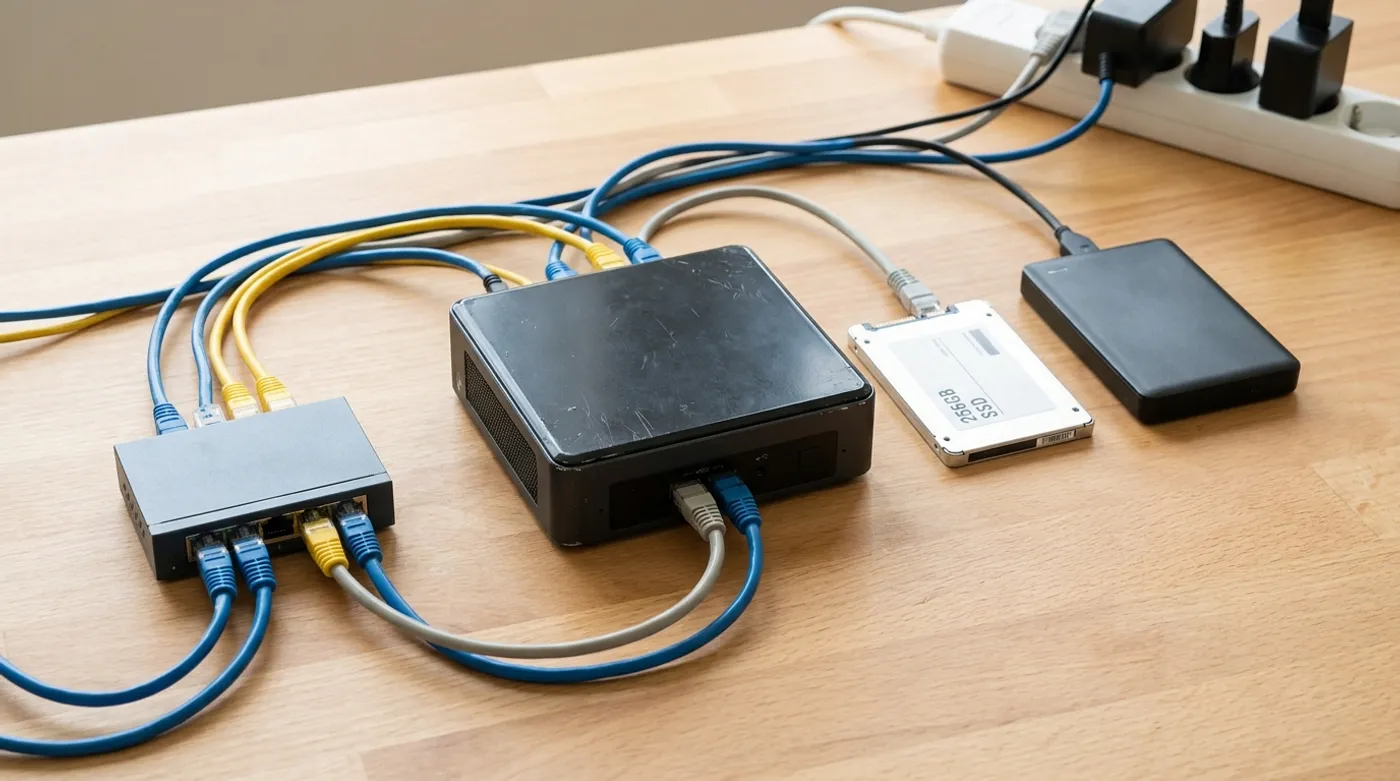
Turn an old PC into useful local-first infrastructure for storage, media, Home Assistant, cameras, backups, Docker, DNS, and monitoring.
That old PC sitting under a desk is probably more useful than half the “smart” devices being sold today.
With the right operating system, a cheap SSD, a wired network connection, and some patience, it can become the local infrastructure layer for your house: file storage, media streaming, Home Assistant, camera recording, backups, private photo management, Docker services, DNS filtering, monitoring, and a real development lab.
The key is not pretending that every dusty desktop is a datacenter. The key is choosing projects that match the hardware and actually improve your home.
Is Your Old PC Still Worth Using?
Before installing forty-seven containers and calling it a home lab, check the boring stuff.
| Part | Minimum Acceptable | Better Target |
|---|---|---|
| CPU | Older Intel i3/i5 or similar AMD chip | Intel 6th gen or newer with Quick Sync |
| RAM | 8 GB | 16 GB or 32 GB |
| System drive | 120 GB or 240 GB SSD | 500 GB SSD or NVMe |
| Data storage | 1 TB hard drive | 2 TB to 8 TB or more |
| Network | Gigabit Ethernet | Gigabit or 2.5GbE |
| Idle power | Under 80W is tolerable | Under 30W is better |
| Noise | Acceptable in a closet | Quiet enough to forget |
If the machine is loud, hot, unstable, and burns power like a space heater, a used mini PC may be the better long-term move. But if the old desktop is already paid for, stable, and has room for drives, it is a perfectly good starting point.
One non-negotiable: use Ethernet. A home server on Wi-Fi is fine for experiments, but it is the wrong foundation for storage, cameras, backups, and automation.
The Ranking: What Actually Matters
Not every old-PC project deserves a weekend. Some are useful. Some are mostly a way to install dashboards you will never open again. For a local-first home, this is the order I would care about.
| Priority | Project | Real Value | Difficulty |
|---|---|---|---|
| 1 | NAS / file server | Very high | Medium |
| 2 | Automatic backup server | Very high | Medium |
| 3 | Home Assistant hub | Very high | Medium |
| 4 | Jellyfin media server | Very high | Medium |
| 5 | Camera NVR with Frigate | Very high | High |
| 6 | Local photo server with Immich | High | Medium |
| 7 | Docker home lab | High | Medium |
| 8 | Proxmox virtualization host | High | Medium/high |
| 9 | DNS and ad blocking | Medium/high | Easy |
| 10 | Home monitoring dashboard | Medium/high | Medium |
| 11 | Local AI experiments | Medium | High |
| 12 | Game server | Medium | Medium |
If you are new, do not start with all twelve. Start with one storage project, one backup project, and one automation project. That gives you value before complexity.
1. Turn It Into a NAS
A NAS is usually the most useful first project for an old PC.
It centralizes the files that should not be scattered across laptops, phones, USB drives, and random cloud accounts:
- documents;
- photos;
- family videos;
- work files;
- Home Assistant backups;
- security camera exports;
- media libraries;
- scanned paperwork;
- device configuration backups.
Good software options:
| System | Best For |
|---|---|
| OpenMediaVault | Beginner and intermediate home NAS builds |
| TrueNAS Scale | More serious storage setups |
| Unraid | Flexible home servers with mixed drives |
| CasaOS | Simple app-style home server management |
| Debian or Ubuntu Server | Maximum control with less hand-holding |
If the PC has only one old hard drive, do not pretend it is safe storage. A NAS is not a backup by itself. It is just a central place where data lives. You still need a second copy somewhere else.
Practical baseline:
- SSD for the operating system;
- one large hard drive for data;
- SMB shares for household devices;
- a simple folder structure;
- scheduled backup to an external drive or encrypted offsite destination.
2. Build An Automatic Backup Server
This should be near the top of the list because nobody cares about backups until the laptop dies, the phone is stolen, or the cloud account gets locked.
An old PC can back up:
- notebooks;
- phones;
- photos;
- documents;
- code projects;
- Home Assistant configs;
- Docker volumes;
- databases;
- camera clips worth keeping.
Good tools:
- Syncthing for device-to-server synchronization;
- Restic for encrypted backups;
- Kopia for friendly deduplicated backups;
- BorgBackup for efficient Linux backup workflows;
- Duplicati for a more GUI-oriented approach;
- Samba for simple network shares.
Use the 3-2-1 rule:
- 3 copies of important data;
- 2 different storage types or devices;
- 1 copy outside the house or in an encrypted cloud target.
The old PC can be the first real backup target. It should not be the only one. Learned that lesson once and did not enjoy the tuition.
3. Run Home Assistant Locally
Home Assistant does not require a Raspberry Pi. It can run on generic x86-64 hardware, and in many cases an old PC is a better base because it has more CPU, more RAM, real storage, and better USB stability. The catch is power draw: an old desktop that idles high all year may cost more to run than a used mini PC.
The clean local-first architecture looks like this:
Old PC or mini PC
  -> Home Assistant
  -> Zigbee2MQTT
  -> Mosquitto MQTT
  -> ESPHome
  -> Local backups
  -> Local dashboards
Add a Zigbee USB dongle and the machine can become the control plane for:
- door and window sensors;
- leak sensors;
- motion and presence sensors;
- smart buttons;
- sirens;
- lighting scenes;
- ESP32 boards;
- energy monitoring;
- local alerts.
Home Assistant OS is the easier path if the PC is dedicated to automation. Docker is more flexible if the same machine will also run NAS tools, monitoring, media services, or a development lab.
Do not skip backups. Home Assistant becomes very important once it controls lights, alarms, sensors, and alerts. Keep automatic local backups and copy them off the machine.
4. Create A Local Media Server With Jellyfin
Jellyfin turns the old PC into a local media server for movies, shows, music, courses, documentaries, and home videos.
Suggested folder structure:
/media
  /movies
  /tv
  /music
  /documentaries
  /courses
  /kids
  /home-videos
The practical stack:
- Debian, Ubuntu Server, OpenMediaVault, or Unraid;
- Docker;
- Jellyfin;
- one large media drive;
- Ethernet;
- smart TV app, browser, tablet, or streaming box.
The warning is transcoding. Direct play is easy. Transcoding is where old CPUs start crying.
If your files are already in a format your TV can play, the server mostly reads files and sends them across the network. If Jellyfin has to convert 4K video on the fly, you want Intel Quick Sync, a supported GPU, or lower expectations.
5. Use It As A No-Subscription Camera NVR
This is where an old PC can become genuinely useful for home security.
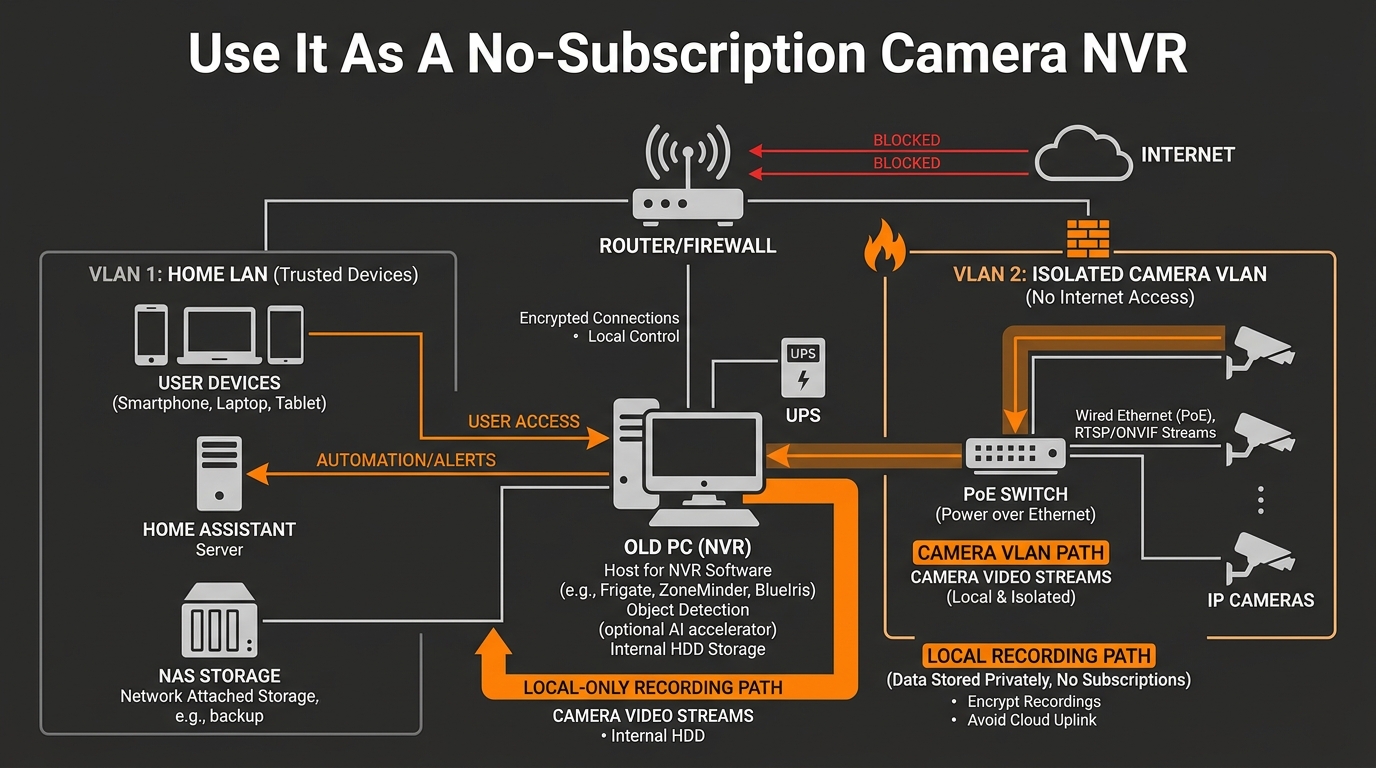
Instead of paying a cloud subscription and trusting a vendor app, the PC records local IP cameras using RTSP, ONVIF-compatible streams, or camera-specific stream URLs. Frigate is especially strong because it is a local NVR designed for Home Assistant and can do object detection locally.
If you are still thinking in terms of one Wi-Fi camera with a microSD card, step back and read Do Not Buy a Wi-Fi Camera Before Understanding NVR Recording. The server-side project makes more sense once the recorder, retention, and evidence path are clear.
The architecture is simple:
IP cameras
  -> PoE switch or Wi-Fi access point
  -> Old PC running Frigate
  -> Local recording disk
  -> Home Assistant alerts
Recommended hardware:
- Intel CPU with integrated graphics if possible;
- 8 GB RAM minimum, 16 GB better;
- SSD for the system;
- large surveillance or NAS drive for recordings;
- Coral TPU or another supported detector if you want serious object detection; CPU detection is acceptable for testing, but it is the first thing I would remove from a permanent multi-camera setup;
- PoE switch for wired cameras;
- separate camera VLAN if you are doing this properly.
Do not run every cheap camera on the same trusted LAN as your laptops and phones. Cameras should be treated like untrusted devices. Let the NVR talk to them. Block their internet access unless you have a specific reason not to.
6. Host Your Own Google Photos Alternative
Photos are too important to leave entirely inside a rented account.
Immich is the obvious project here: automatic phone backup, timeline browsing, albums, search, and local storage. It gives you a private photo system without pretending that your phone camera roll belongs inside a company policy document.
Good stack:
- Docker;
- Immich;
- PostgreSQL;
- a large storage drive;
- scheduled backups;
- VPN for remote access instead of exposing it directly to the internet.
The hard rule: Immich is not the backup by itself. It is the photo application. Back up the library and database somewhere else.
7. Create A Docker Home Lab
If you write code, work in IT, or want to learn infrastructure without renting cloud instances for every experiment, an old PC is a great Docker lab.
Useful services:
- PostgreSQL;
- Redis;
- RabbitMQ;
- SQL Server container;
- Seq;
- Grafana;
- Prometheus;
- NGINX Proxy Manager;
- Uptime Kuma;
- small APIs;
- internal tools;
- GitHub Actions self-hosted runner.
This is especially good for developers because it makes infrastructure physical. You learn ports, volumes, permissions, DNS, reverse proxies, logs, health checks, backups, and upgrades in a way that a clean tutorial never teaches.
Just do not mix experiments with critical home services without boundaries. A broken dev container should not take down Home Assistant, DNS, or camera recording.
8. Run Proxmox And Virtual Machines
Proxmox turns the old PC into a virtualization host. Instead of one server, you get several logical machines:
- one VM for Home Assistant;
- one VM or LXC for Docker;
- one VM for experiments;
- one VM for network tools;
- one storage-focused VM if the design makes sense.
Use Proxmox if you want separation and learning. Avoid it if you want the simplest possible home server.
Good requirements:
- 16 GB RAM or more;
- SSD for the host and VM disks;
- CPU virtualization support enabled in BIOS;
- reliable backups of VMs and containers;
- UPS if the machine runs critical services.
The trap is overbuilding. Proxmox is excellent, but it can turn a simple home server into a hobby inside the hobby. If your goal is just Jellyfin and file shares, Debian plus Docker may be cleaner.
9. Add Network-Wide Ad Blocking And Local DNS
Pi-hole or AdGuard Home can make an old PC useful even if the hardware is not strong enough for media, VMs, or NVR work.
What it gives you:
- network-level ad and tracker blocking;
- DNS visibility for your home;
- local names like
nas.localorhomeassistant.local; - cleaner device logs;
- a central place to see what devices are calling out.
Pair it with Unbound if you want local recursive DNS. Pair it with WireGuard or Tailscale if you want private access back home.
Important: do not make DNS a single point of failure without a plan. If the old PC goes down and every device points only to it for DNS, your family will think the internet is broken. Use a secondary DNS path or make the server reliable.
10. Monitor Your Home Infrastructure
Once a home server starts running real services, you need visibility.
Good monitoring targets:
- server temperature;
- disk health;
- available storage;
- internet uptime;
- camera recording status;
- Home Assistant status;
- backup success;
- UPS battery;
- freezer temperature;
- water leak sensors;
- energy consumption.
Useful stack:
- Uptime Kuma for service checks;
- Grafana for dashboards;
- Prometheus for metrics;
- Home Assistant for household sensor state;
- MQTT for ESP32 and device telemetry;
- smart plug with power monitoring for server consumption.
This is not just nerd decoration. Monitoring tells you that backups stopped working before the day you need them.
11. Experiment With Local AI
Can an old PC run local AI? Yes, within limits.
Possible projects:
- small local language models;
- local transcription;
- private document search;
- Home Assistant Assist experiments;
- lightweight automation helpers;
- voice pipelines with Whisper and Piper;
- local dashboards that summarize sensor state.
Useful tools:
- Ollama;
- Open WebUI;
- Whisper;
- Piper TTS;
- Home Assistant Assist;
- local RAG tools for documents.
The honest warning: without a decent GPU or modern CPU, do not expect miracles. You can learn, prototype, and build private workflows. You cannot turn a 2012 office desktop into a high-end AI workstation by installing Docker and believing harder.
12. Host Game Servers
This is useful, but secondary for this site.
An old PC can host:
- Minecraft;
- Terraria;
- Valheim;
- private LAN servers;
- small friend-group servers;
- local installer archives and backups.
It is a fun project, but NAS, backups, Home Assistant, cameras, and DNS usually matter more for a local-first home.
Best Operating Systems For An Old PC Home Server
Choose the operating system based on your goal, not internet arguments.
| Goal | Best Starting Point |
|---|---|
| Simple NAS | OpenMediaVault |
| Serious storage | TrueNAS Scale |
| Mixed home server | Unraid |
| Simple app dashboard | CasaOS |
| Docker learning | Ubuntu Server or Debian |
| Virtual machines | Proxmox |
| Dedicated automation | Home Assistant OS |
| Maximum control | Debian |
My default recommendation for most people:
- beginner storage-focused build: OpenMediaVault;
- beginner automation-only build: Home Assistant OS;
- flexible server build: Debian or Ubuntu Server with Docker;
- advanced lab build: Proxmox.
What Not To Do With An Old PC
Do not use it as a fake enterprise server without backups.
Do not expose random services directly to the internet because a tutorial told you to forward ports. Use a VPN, private tunnel, or carefully managed reverse proxy only when you understand authentication, updates, TLS, and logs.
Do not run critical security cameras on a dying hard drive.
Do not put Home Assistant, DNS, backups, NVR, and dev experiments all on one unstable machine with no UPS and no recovery plan.
Do not keep important data only on the old PC.
Do not ignore power consumption. A free PC that wastes electricity every month is not free.
Budget Tiers
You can start cheap, but a few upgrades matter.
| Tier | Cost | What It Means |
|---|---|---|
| Zero-cost test | $0 | Use the PC as-is to learn Docker, file shares, or Jellyfin |
| Basic useful server | $40-120 | Add SSD, clean install, maybe one used hard drive |
| Solid home server | $150-350 | SSD, larger hard drive, RAM upgrade, UPS |
| Serious local-first box | $350-700+ | Multiple drives, 2.5GbE, UPS, better storage, camera/NVR support |
If money is tight, buy in this order:
- SSD for the operating system.
- Enough RAM to avoid constant swapping.
- Reliable data drive.
- UPS for critical services.
- Better network adapter only if you actually need it.
The Best Beginner Path
If you want the most value without drowning in complexity, do this:
- Install OpenMediaVault, Debian, or Ubuntu Server.
- Put the operating system on an SSD.
- Create one clean data share.
- Add Syncthing or Kopia for backups.
- Add Jellyfin if you have media.
- Add Home Assistant later if the machine stays stable.
- Add monitoring before adding more services.
That path gives you storage, backup, media, and automation without turning the first weekend into a recovery exercise.
The Advanced Path
If you already know your way around Linux, containers, and networking, build it like infrastructure:
Proxmox or Debian
  -> storage layer
  -> Docker host
  -> Home Assistant VM/container
  -> Frigate/NVR storage path
  -> backup jobs
  -> monitoring
  -> UPS shutdown handling
  -> VLAN-aware network design
At that point, the old PC is not a toy anymore. It is the local backbone of the house. Treat it like one.
Final Recommendation
The best use for an old PC is not one flashy project. It is a small stack of boring, reliable services that keep your digital house under your control.
Start with storage and backups. Add Home Assistant when you are ready. Add Jellyfin if media matters. Add Frigate only when you are ready to think about cameras, disks, retention, and network isolation. Add Proxmox only if separation is worth the complexity.
The goal is not to self-host everything. The goal is to own the parts of your home that should keep working when the internet, cloud account, vendor app, or subscription model decides to become a problem.
Hey man, I literally do not like automatically generated AI content. This is lived experience and real hands-on work, so share it if you find it useful :)
Keep reading
Related guides
Build an Offline Multimodal Voice Assistant for Home Assistant
Build a local Home Assistant voice pipeline with wake word, speech, Gemma 4 context, allowlisted actions and spoken responses.
Reduce Food Waste With Local OCR, Private RAG and Fridge Photos
Turn fridge photos into a private local inventory with OCR, recipe retrieval and honest date-label alerts that require confirmation.
Build an Offline Care Assistant for Older Adults or Pets
Combine local voice, fall signals, medication reminders and family alerts without turning a home lab into a medical device.