Proxmox VM backups: test a restore before trusting the schedule
Restore a Proxmox VM into an isolated test environment, check application data and dependencies, and record a recovery time you can use.

Restore a Proxmox VM into an isolated test environment, check application data and dependencies, and record a recovery time you can use.
The backup job finished successfully. Now answer the harder question: can you use that backup to start the service and recover the data your household needs?
A restore drill should produce a second, isolated VM and a short record of what worked. Start with a small guest whose behavior you understand. A test that boots an old dashboard but silently contacts production services can create more trouble than a failed backup.
Your deliverable is a stopped or isolated test guest, a checked application record and a recovery note listing what remains untested. A successful task log is encouraging. It is also perfectly capable of sitting there looking green while the application is unusable.
Define the failure you are rehearsing
This drill tests restoring one VM from an existing backup while the original remains available. It does not prove that you can rebuild the Proxmox host, reconnect storage or recover a lost backup encryption key. Those are separate recovery tasks.
Pick an application-level success condition before starting. For a document service, that might mean signing in with a test account and opening a known document. For a database-backed dashboard, use a known record with a timestamp. A login screen alone proves little about the data behind it.
Write down the recovery point you expect to find. If last night’s backup predates this morning’s upload, that upload should not appear in the restored copy. Otherwise you may accidentally validate the live service instead of the restored one.
Inspect what the backup depends on
Record the original VM ID, guest operating system, backup timestamp, backup storage and intended restore storage. Check available capacity and leave room for both the existing guest and restored disks. Ensure you can access the backup and any required keys independently of the guest you are restoring.
Inspect the guest’s disk configuration and backup task log. Disks excluded from backup, external network shares and passed-through devices need their own recovery plan. A restored operating system does not bring back a separate NAS share just because the old mount configuration survived.
Proxmox supports scheduled guest backups and several backup modes. For running VMs, snapshot-mode backup can use the enabled, running QEMU Guest Agent’s freeze/thaw support to improve filesystem consistency. This does not replace application-specific recovery checks. The official backup chapter describes these mechanisms and their tradeoffs.
For an application with a database, check its own supported backup method too. Keep the relevant export or recovery procedure with the VM recovery notes. Our Immich backup article illustrates why application data and media need explicit coverage.
Restore into a stopped, clearly named guest
Use the backup storage’s content view to select the intended recovery point and start Restore. Choose an unused VM ID and a recognizable name such as restore-test-documents. Choose storage that can hold the restored disks. Leave automatic start after restore disabled.
Do not overwrite the original VM to perform a routine drill. If the restore dialog offers identity-regeneration options, understand what they change, but do not treat them as network isolation: the guest may still contain its original static IP, hostname, application credentials and scheduled tasks.
After restoration completes, inspect the stopped guest’s hardware. Check every network interface and any passthrough or shared resource before booting. Menu wording varies by Proxmox release; verify the choices against your installed version rather than guessing from an old screenshot.
Isolate the copy before its first boot
For the initial boot, disconnect all restored virtual network adapters and use the Proxmox console. Keep the host management network untouched. Do not modify the production bridge just to make the drill easier.
If application testing needs networking, prepare a separate test bridge with no physical uplink, host IP or route into production. Check that no router VM, forwarding rule or second interface reconnects that segment to the live LAN. A second test VM can provide a browser or other client inside the segment. Treat that client as part of the isolation boundary too.
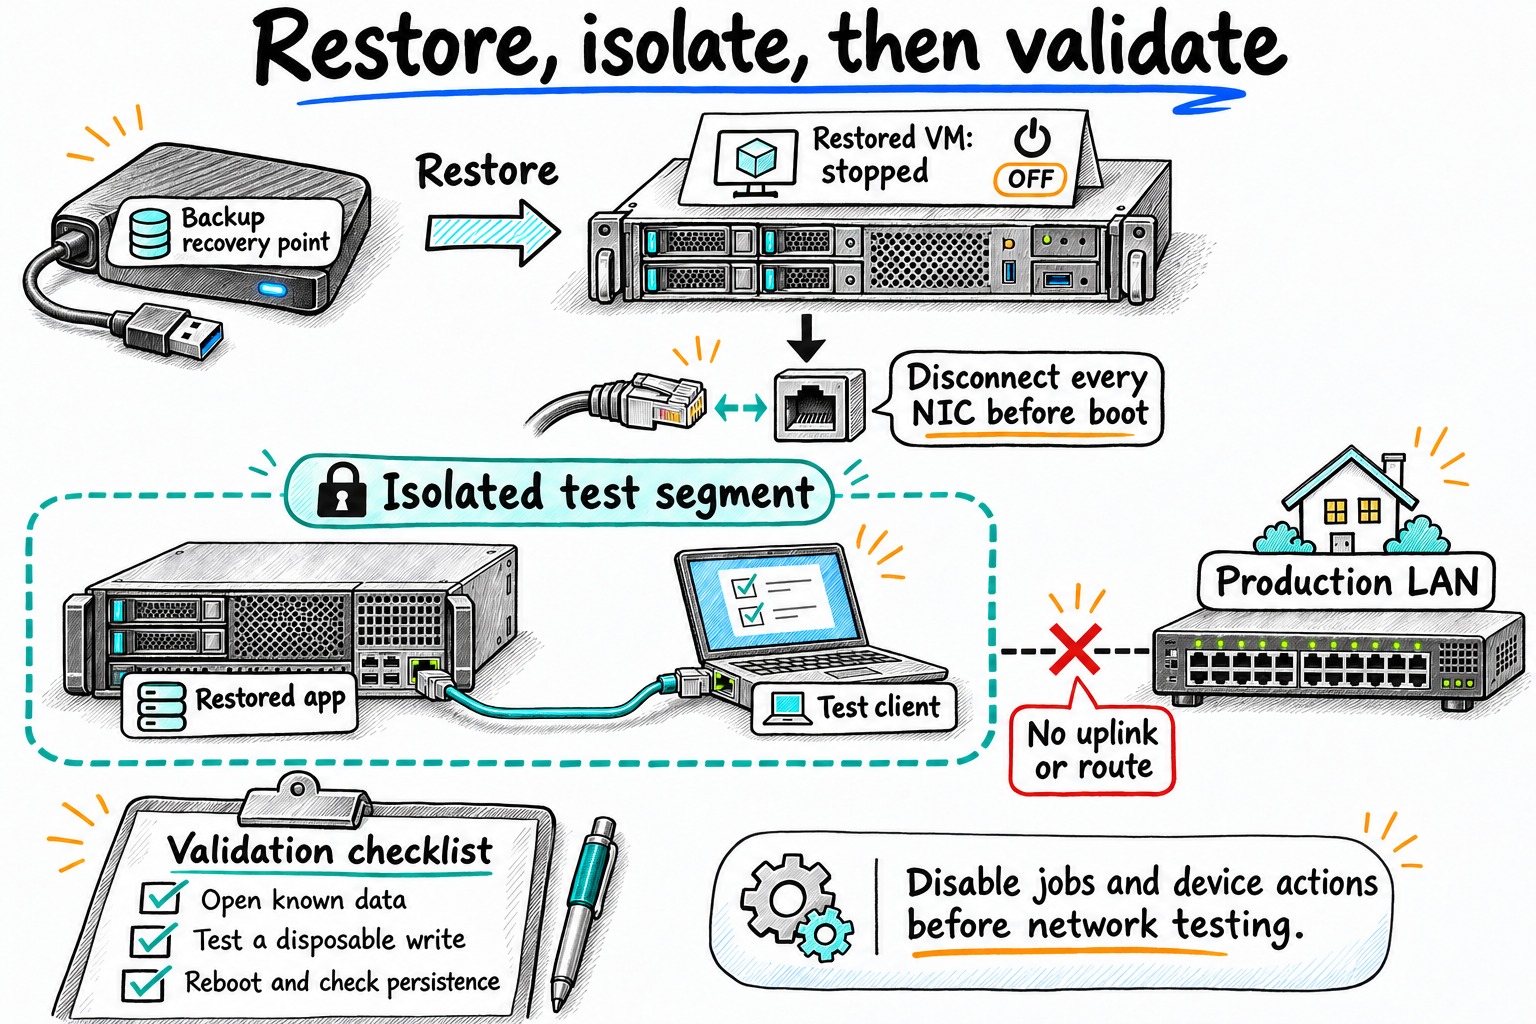
Before connecting the copy to the test segment, review scheduled jobs, email delivery, webhooks, device integrations and external storage mounts. Disable or redirect outbound actions within the restored guest. A recovered automation server should not start operating the house alongside the original.
Test the service behind the boot screen
Begin with the console: check that the expected filesystems are mounted, the clock is sensible and the required services start. Missing dependencies are a finding, not a reason to connect the copy directly to production.
Then exercise the success condition you wrote down. Open the known document or query the known record. If the application needs a DNS name, provide an isolated test mapping rather than changing household DNS. A dependency that cannot safely be reproduced may limit this drill; record that limitation instead of marking the entire application verified.
If you create a disposable record inside the restored application, restart the guest and check that it persists. This helps distinguish a usable restored service from a page that happens to load once. Confirm that the live application was not changed by your test.
| Observation | What it tells you |
|---|---|
| Restore task completed | The selected backup could be processed in this environment |
| Guest booted | The restored guest can start with the selected virtual hardware |
| Known data opened | The tested application path contains usable expected data |
| Test change survived reboot | The tested write path persists in the restored guest |
| External dependency untested | Recovery remains partial for that dependency |
A successful restore on the same host still leaves host-loss recovery untested. If the household depends on this service, eventually repeat the exercise on spare hardware or document a realistic route to replacement capacity.
Decide whether this drill passed
Use a narrow pass condition: the isolated copy opens the expected recovery-point data, accepts a disposable change and retains that change after reboot. Keep dependencies you could not reproduce explicitly outside that result.
If the guest boots but the document is missing, stop and check the selected backup timestamp and disk coverage. If the application waits for a production database or share, document that dependency before extending the isolated test environment. Connecting it to the live LAN to silence an error would defeat the point of the exercise.
Record the original and test VM IDs side by side before cleanup. Restoring to the wrong target and deleting the wrong guest are avoidable ways to turn a rehearsal into the incident.
Measure recovery rather than just disk copying
Start the timer when you begin finding credentials, backup storage and instructions. Stop it when the isolated service meets the defined success condition. Record transfer time separately if useful, but do not call transfer completion the total recovery time.
Keep a short drill note: source recovery point, restored VM ID, storage, checks performed, failed dependencies, elapsed time and follow-up action. Do not insert estimated timings as if they were measured results. The first honest result can be that you spent twenty minutes searching for a credential; that is exactly the kind of friction a drill should expose.
Shut the test guest down when finished. Retain it only as long as needed to investigate findings, then remove the explicitly identified test resources after checking their IDs and disks. Preserve the source backup and original VM.
Repeat after a major storage change, application migration or credential change. The useful outcome is a recovery procedure someone can follow under pressure, with the untested parts written down.
Keep reading
Related guides

Syncthing is not a backup: build a recovery path that survives mistakes
Use Syncthing for daily file access, then add independent recovery. Learn what versioning protects and test a restore without risking your files.
Local ChatGPT: model size in GB and 16–32 GB RAM builds
How many GB does local AI need? Compare 2.0 GB and 4.9 GB model downloads, RAM and VRAM needs, and what differs from using ChatGPT online.
Local RAG With Open WebUI: Chat With Documents Without the Cloud
Build an offline Open WebUI RAG workflow for PDFs with local embeddings, practical chunking, evidence checks and private storage.