Build a Local-First Whole-Home Energy Monitoring System
Monitor whole-home energy locally with ESPHome, Shelly meters, MQTT, Home Assistant, and sane electrical safety boundaries.
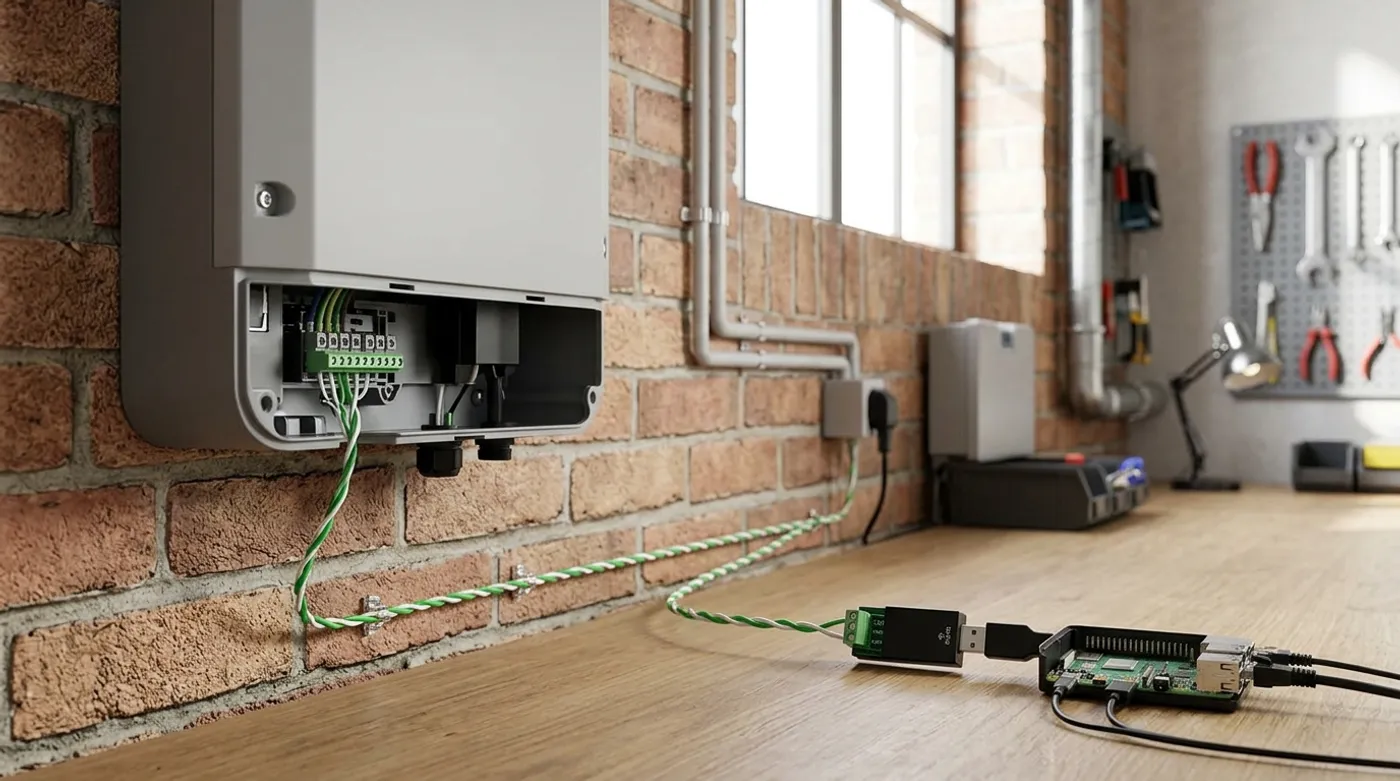
Monitor whole-home energy locally with ESPHome, Shelly meters, MQTT, Home Assistant, and sane electrical safety boundaries.
Whole-home energy monitoring is one of the rare smart home projects that is not just “turn a light on, but with more YAML.” Done well, it tells you when the HVAC is misbehaving, when a NAS and UPS are quietly becoming a space heater, when solar export does not match the inverter app, and whether an EV charger is about to make your panel regret its life choices.
The local-first version has a simple rule: the meter lives on your network, the readings land in your systems, and the house still makes sense when a vendor cloud, mobile app, or SaaS dashboard is unavailable. The hard part is not drawing a pretty graph. The hard part is choosing hardware that is appropriate for your panel, keeping mains work inside professional boundaries, and not treating measurement data as trustworthy until it has survived boring real-world failures.
Start With the Boundary: This Is Panel Work
If the sensor goes inside the electrical panel, the installation belongs to a qualified electrician or to someone legally allowed and competent to work on that panel in your jurisdiction. Turn off the breaker is not a magic spell. Split-phase and three-phase panels can still have energized sections, service conductors, shared neutrals, backfeed from solar, generator interlocks, and enough stored stupidity in the design to ruin a day.
The safe division of labor looks like this:
- Electrician work: opening the panel, placing CT clamps, landing voltage reference wires, installing DIN rail devices, adding breakers, confirming torque, verifying conductor routing, and closing the panel correctly.
- Homelab work: configuring Wi-Fi or Ethernet, MQTT topics, Home Assistant sensors, databases, dashboards, alerts, backups, and network policy.
- Absolutely not a hobby flex: loose mains modules, unprotected wiring, undersized conductors, mystery AliExpress terminals, or “temporary” panel wiring that somehow becomes permanent because it worked once.
You can still build a deeply technical local-first system. Just do not confuse “I can flash firmware” with “I should be inside a live load center.” The universe already has enough ways to humble engineers.
Pick the Hardware Path
There are three practical paths.
| Path | Typical hardware | Best for | Typical budget |
|---|---|---|---|
| DIY cheap | ESP32 + PZEM-004T V3 + 100A CT | learning, bench testing, single-phase experiments | US$15-35 |
| Intermediate | Shelly EM or Shelly Pro EM-50 | simpler local integration, single-phase or split-phase monitoring | US$60-120 |
| Professional | Shelly Pro 3EM or 3EM Gen3 class | whole-home, solar, three-phase, serious dashboards | US$120-220 |
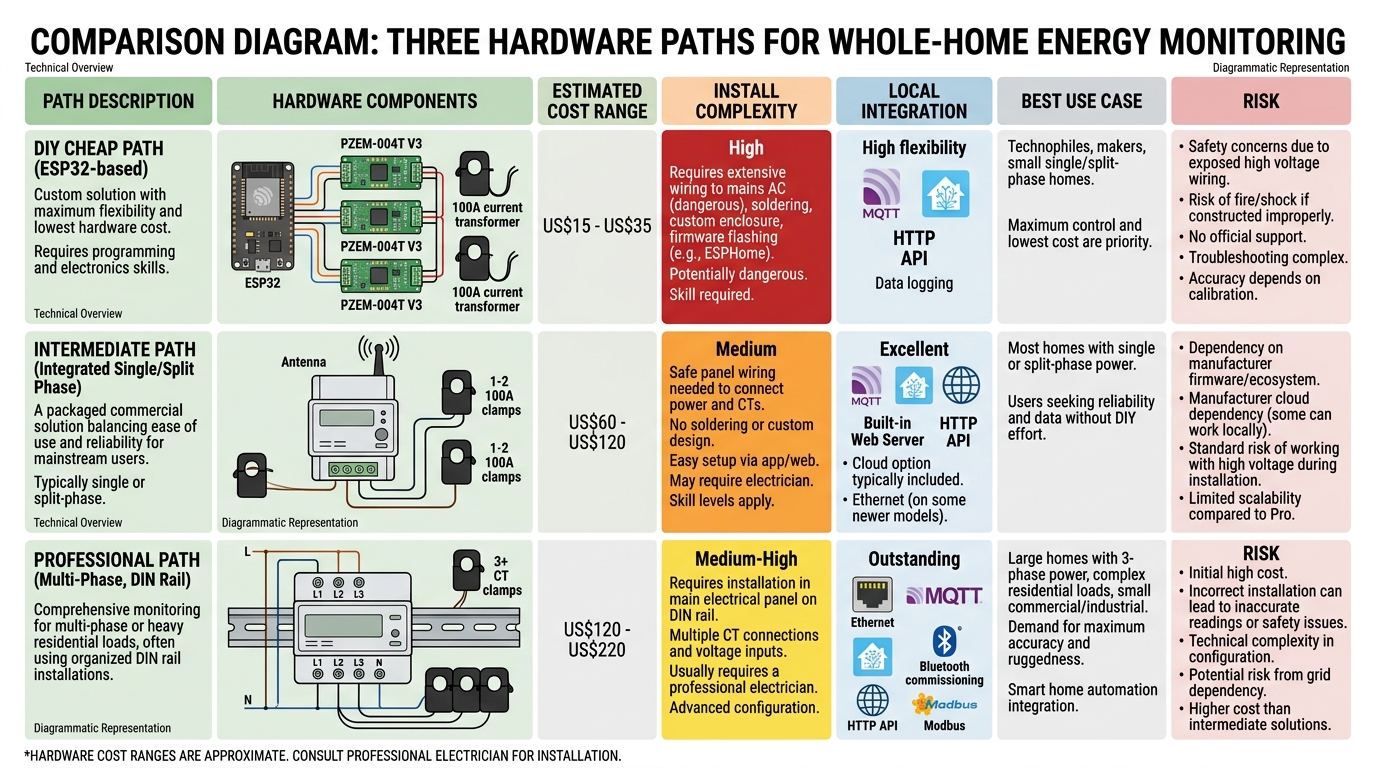
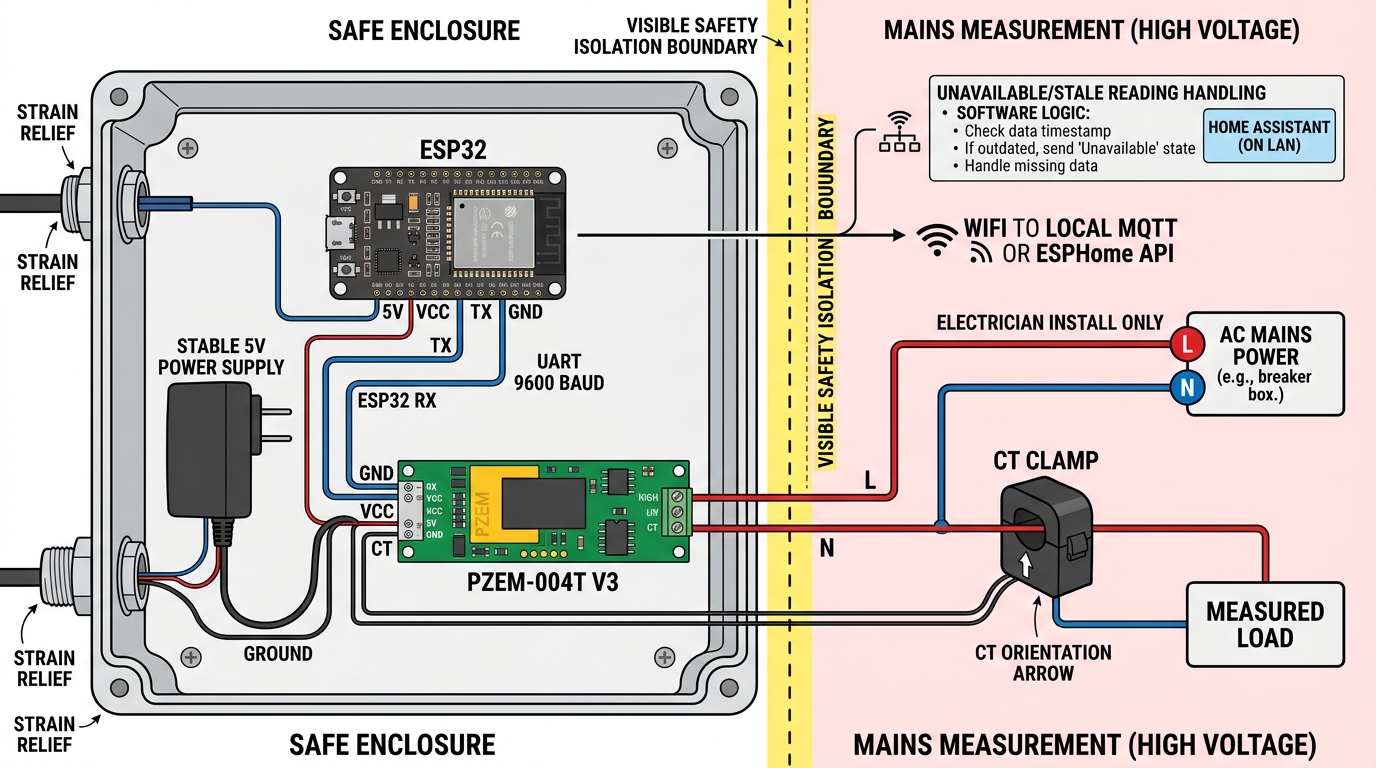
The PZEM route is the hacker path. ESPHome supports the PZEM-004T V3 through the pzemac sensor platform, using UART and Modbus at 9600 baud, and can expose current, voltage, power, energy, frequency, and power factor sensors. It is cheap and transparent, but it also puts more responsibility on your enclosure, power supply, wiring, firmware, and recovery behavior.
The Shelly route is less romantic and usually better for a real house. Devices such as the Shelly Pro EM-50 and Pro 3EM class are DIN rail products with local LAN/Wi-Fi operation and local integration paths such as MQTT, HTTP/RPC, and WebSocket. That does not remove the need for a proper install, but it removes a lot of “why is my bench module in a plastic box next to breakers?” energy from the project.
The Local-First Architecture
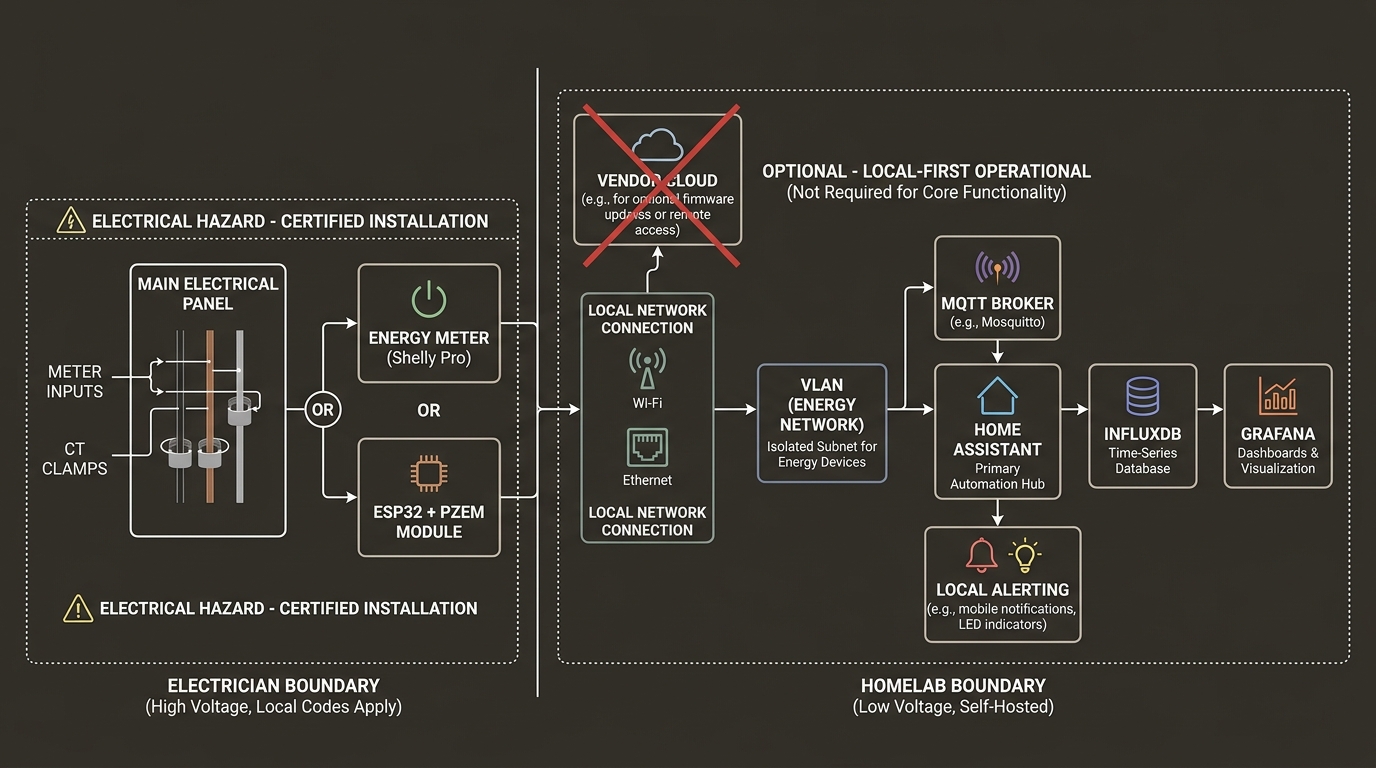
The architecture is not complicated:
CT clamps / meter inputs
  -> energy meter or ESP32 gateway
  -> local Ethernet or Wi-Fi
  -> MQTT broker or local HTTP/RPC polling
  -> Home Assistant sensors
  -> long-term storage
  -> dashboards and alerts
For a small but serious setup:
Energy VLAN:       10.40.0.0/24
Shelly Pro 3EM:    10.40.0.10
MQTT broker:       10.20.0.20
Home Assistant:    10.20.0.20
InfluxDB/Grafana:  10.20.0.30
NTP/DNS:           10.20.0.1
Firewall policy:
- allow the meter to reach local DNS and NTP
- allow the meter to publish MQTT to the broker, if using push telemetry
- allow Home Assistant or a poller to reach the meter HTTP/RPC API, if using polling
- block the meter from general internet access unless you intentionally use firmware updates or vendor cloud features
- block random client VLANs from opening the meter admin UI
Yes, this is a lot of care for a device that reports watts. The same device is also sitting in the trust zone between your home automation and your electrical panel, so maybe it can have a firewall rule instead of vibes.
DIY Path: ESP32 With PZEM-004T V3
The DIY version is attractive because the bill of materials is tiny:
- ESP32 development board
- PZEM-004T V3 AC energy monitor
- compatible current transformer, often 100A in common kits
- safe enclosure
- stable 5V power
- terminal blocks and strain relief suitable for the installation
Read the diagram below as a system boundary map, not as a field wiring recipe. If this gets used for a real panel, the mains side still belongs to a qualified electrician and the module belongs in a proper enclosure with correct isolation, strain relief, and local code compliance.
ESPHome configuration shape:
uart:
  rx_pin: GPIO16
  tx_pin: GPIO17
  baud_rate: 9600

modbus:

sensor:
  - platform: pzemac
    current:
      name: "Main Panel Current"
    voltage:
      name: "Main Panel Voltage"
    power:
      name: "Main Panel Active Power"
    energy:
      name: "Main Panel Energy"
    frequency:
      name: "Main Panel Frequency"
    power_factor:
      name: "Main Panel Power Factor"
    update_interval: 10s
That is the easy part. The serious part is everything around it.
The PZEM metering side is powered from AC, so your firmware may boot before the module has valid readings. Handle unavailable values. Do not build automations that assume the first value after boot is trustworthy. In Home Assistant, use availability, expire_after, and sanity checks before acting on readings.
Good ESPHome hygiene:
api:

logger:
  level: INFO

ota:
  - platform: esphome

wifi:
  ssid: !secret energy_wifi_ssid
  password: !secret energy_wifi_password
  manual_ip:
    static_ip: 10.40.0.21
    gateway: 10.40.0.1
    subnet: 255.255.255.0

time:
  - platform: sntp
    id: local_time
    servers:
      - 10.20.0.1
Avoid the classic failure mode: the ESP32 is powered by a cheap USB charger, mounted in a warm enclosure, connected with loose jumper wires, and expected to become infrastructure. That is not infrastructure. That is a future troubleshooting thread wearing a hat.
Shelly Path: Local MQTT or RPC
With a Shelly Pro EM-50 or Pro 3EM class meter, the architecture can be cleaner:
Shelly meter
  -> Ethernet preferred, Wi-Fi acceptable when signal is strong
  -> MQTT broker or local RPC polling
  -> Home Assistant
  -> InfluxDB / Grafana for long-term trends
A DIN rail meter makes the permanent install cleaner, but CT direction, phase mapping, voltage reference, conductor sizing, enclosure space, and torque still have to be correct. The image below is useful for understanding the moving parts; it is not a substitute for the manufacturer wiring sheet or an electrician.
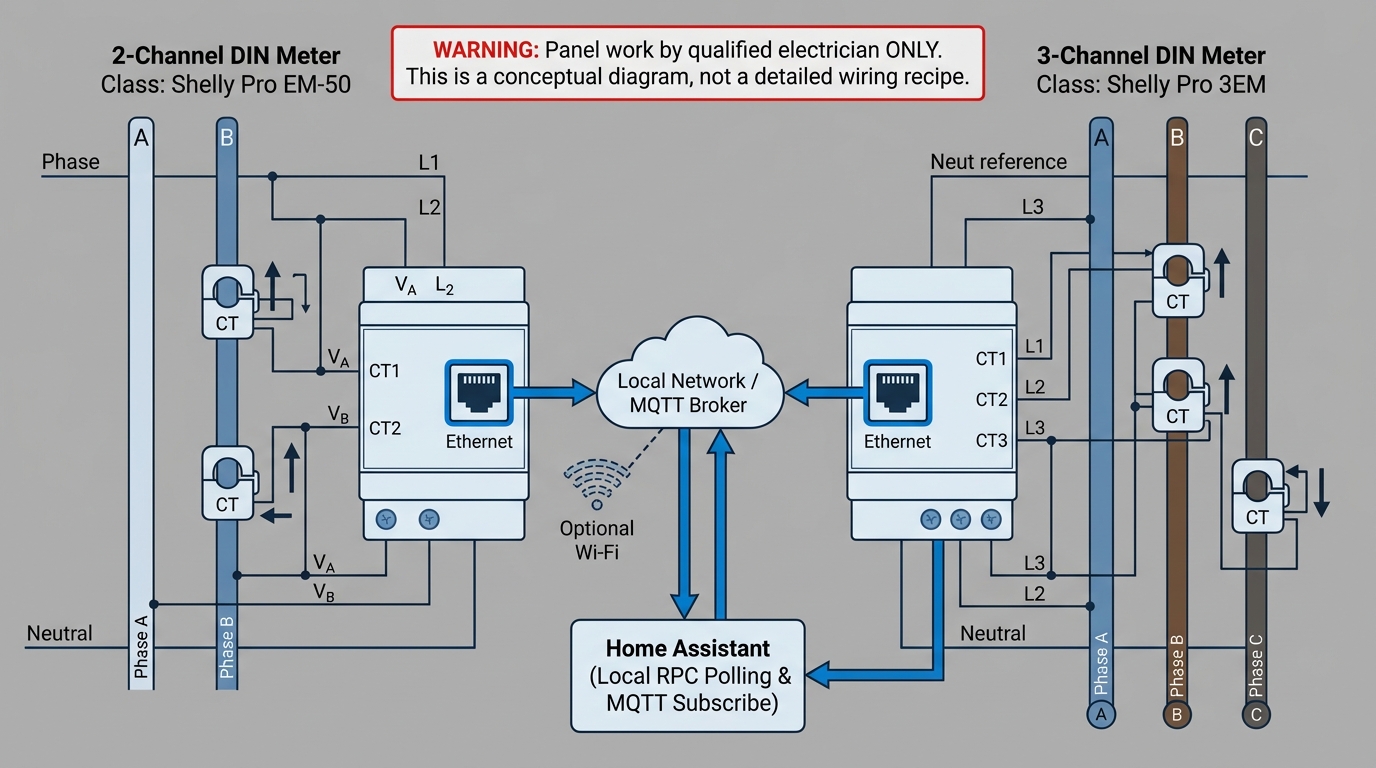
Use Ethernet when the panel location allows it. Wi-Fi can work, but panels, utility rooms, inverters, masonry, and metal doors are not exactly a spa day for 2.4 GHz. If Wi-Fi RSSI is bad with the panel closed, fix the network before blaming MQTT.
For polling over local RPC, the basic status call shape is:
curl "http://10.40.0.10/rpc/EM.GetStatus?id=0"A response from a three-phase energy meter class device can include per-phase current, voltage, active power, apparent power, power factor, frequency, total current, and total active power. Negative active power is not automatically wrong; in solar or split-flow setups, sign convention matters. If you treat every negative watt as a bug, your dashboard will lie the moment the house exports energy.
For MQTT, publish into boring topics:
home/energy/main/phase_a_power_w
home/energy/main/phase_b_power_w
home/energy/main/phase_c_power_w
home/energy/main/total_power_w
home/energy/main/import_energy_kwh
home/energy/main/export_energy_kwh
home/energy/main/availability
Do not name topics after a vendor if the values are meant to become part of your permanent data model. Hardware changes. Your database should not need therapy because you moved from a DIY meter to a DIN rail meter.
Split-Phase, Three-Phase, and Solar Are Different Problems
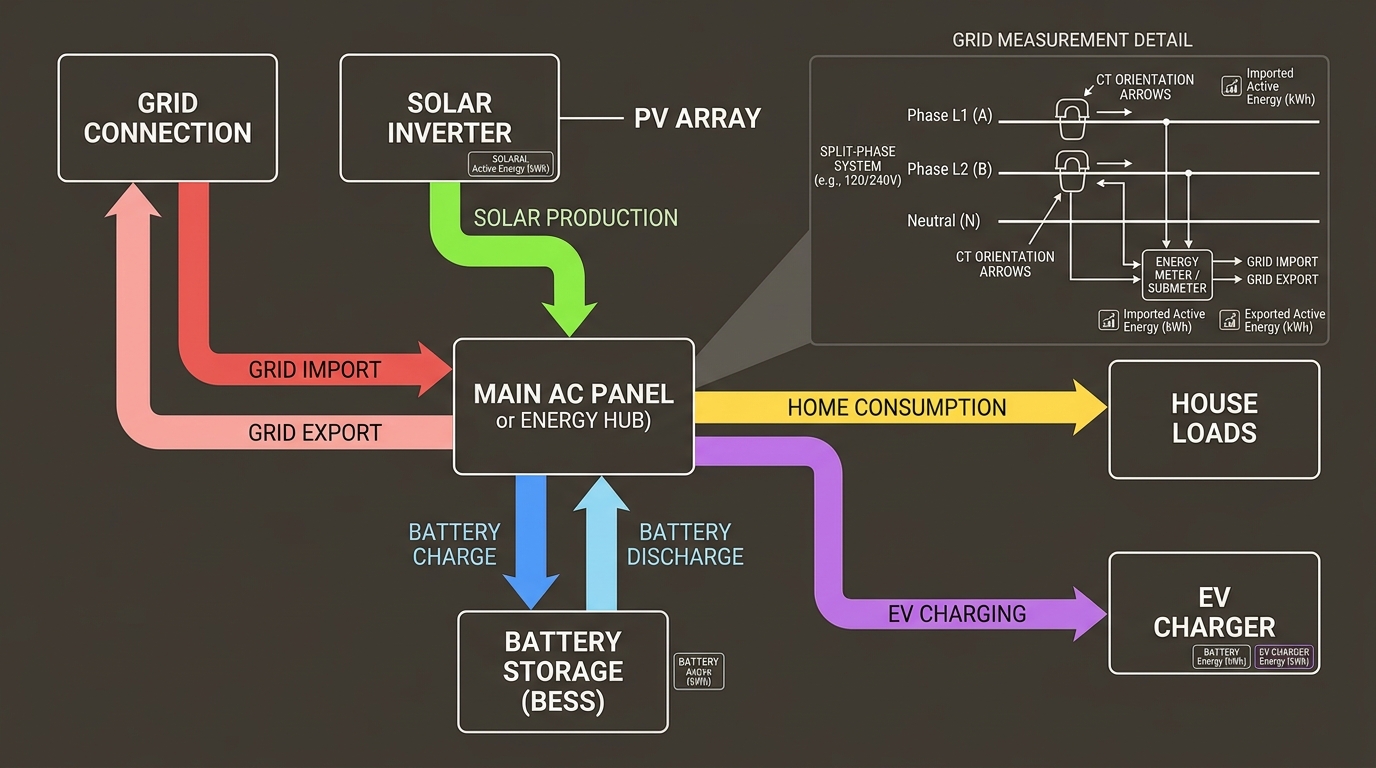
In North America, many homes are split-phase. In much of the world, single-phase and three-phase service are common. Solar and battery systems add directionality. EV chargers add large step loads. Heat pumps add long compressor cycles. A whole-home monitor must match the electrical reality, not the diagram from a product listing.
Common mistakes:
- measuring only one leg of a split-phase service and pretending it is whole-home power
- reversing CT orientation and getting negative import
- mixing solar production and grid import in one number without labeling direction
- using a 50A CT on a conductor that can exceed it
- placing CT clamps around both live and neutral, which can cancel the reading
- assuming all phases share the same voltage behavior
For split-phase monitoring, you normally need both legs measured and summed with the correct sign. For three-phase, phase order and CT assignment matter. If the meter reports a phase sequence error, do not hide it in the UI because the graph looks pretty. Fix the mapping.
Solar deserves extra care. Decide which question each sensor answers:
- Grid import/export: what flows between house and utility
- Solar production: what the inverter produces
- Home consumption: what loads actually consume
- Battery charge/discharge: what the battery is doing
Those are not interchangeable. The app that shipped with your inverter may blur them for marketing reasons. Your local telemetry should not.
Home Assistant Sensors That Do Not Lie Quietly
For MQTT sensors, prefer explicit units, device classes, state classes, and expiration.
mqtt:
  sensor:
    - name: "Main Panel Total Power"
      state_topic: "home/energy/main/total_power_w"
      unit_of_measurement: "W"
      device_class: power
      state_class: measurement
      expire_after: 60

    - name: "Main Panel Import Energy"
      state_topic: "home/energy/main/import_energy_kwh"
      unit_of_measurement: "kWh"
      device_class: energy
      state_class: total_increasing
Use expire_after for live power. Stale power data is worse than missing data because it looks actionable. If the meter died at 4.2 kW and the dashboard keeps showing 4.2 kW for six hours, that is not observability. That is theater with numbers.
For Home Assistant Energy dashboards, be strict:
- power uses watts and
state_class: measurement - energy uses kWh and
state_class: total_increasing - import and export should be separate sensors when possible
- reset behavior must be understood before feeding long-term statistics
- never convert an unstable power sensor into energy with blind integration and call it a utility meter
The integration helper can estimate energy from power, but utility-style accounting should come from a real accumulated energy counter when the hardware exposes one.
Store the Data Locally
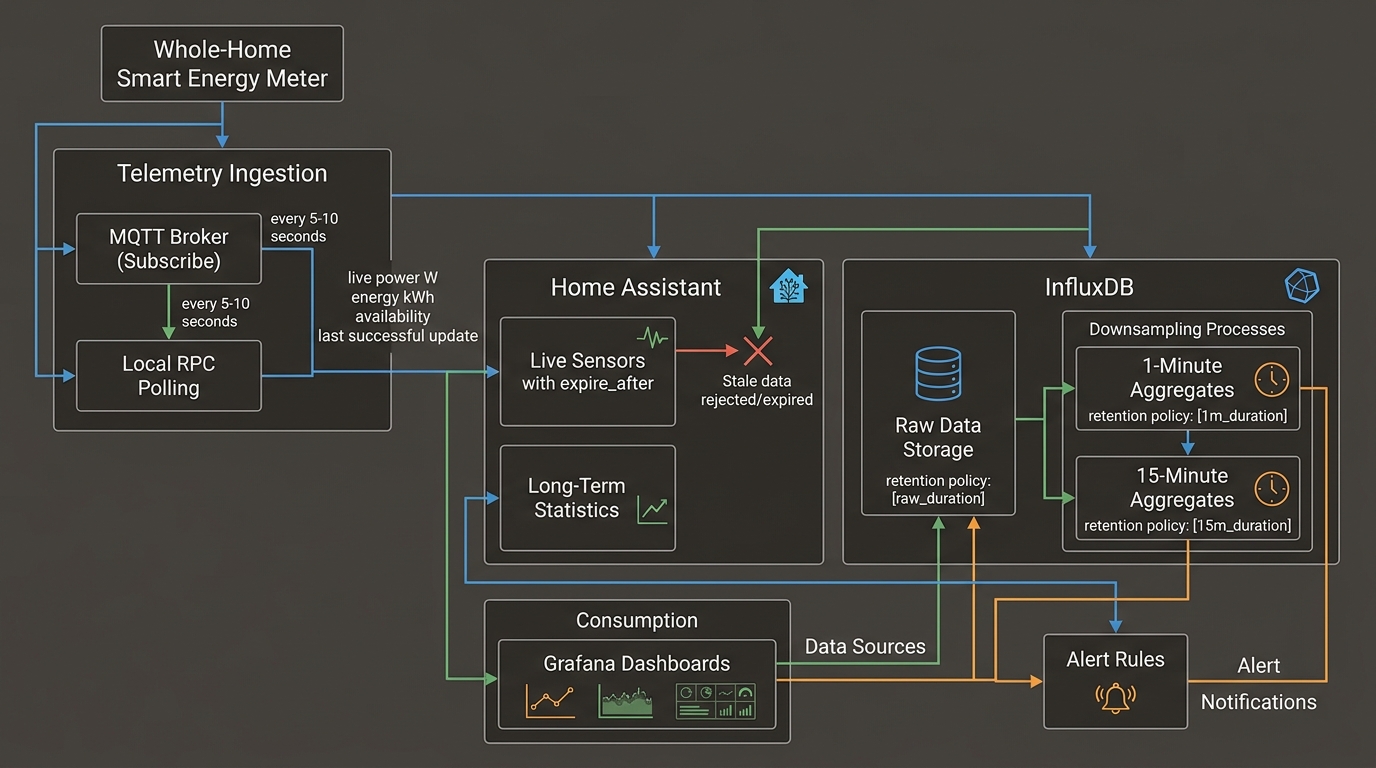
Home Assistant long-term statistics are enough for many people. If you want technical analysis, push the data into InfluxDB or another local time-series store and keep retention intentional.
Reasonable retention:
1s-10s raw power: 7 to 30 days
1m aggregates:    1 to 2 years
15m aggregates:   long-term
daily kWh:         permanent
Useful derived metrics:
- base load between 02:00 and 04:00
- daily import and export
- solar self-consumption percentage
- UPS and rack load trend
- HVAC cycle length
- EV charging sessions
- unexpected night load above baseline
Do not store everything forever at full resolution unless you enjoy turning a power monitor into a database maintenance project. You need signal, not a museum of every watt your refrigerator ever considered using.
Alerts Worth Having
Good energy alerts are boring and specific:
- total load above a panel-safe threshold for more than a few minutes
- unexpected sustained load overnight
- solar production missing during daylight while inverter is online
- grid import high while battery should be discharging
- rack or NAS load increased after a hardware change
- EV charging started outside the intended window
- meter stopped reporting
Bad alerts fire every time the kettle turns on. The house already knows someone made tea. It does not need PagerDuty.
Use debounce windows:
alias: "Energy monitor offline"
trigger:
  - platform: state
    entity_id: sensor.main_panel_total_power
    to: "unavailable"
    for: "00:05:00"
action:
  - service: notify.mobile_app_phone
    data:
      message: "Whole-home energy monitor has not updated for 5 minutes."
Use thresholds that match your service and actual loads. A 5 kW alert may be useful in a small apartment. In a house with an EV charger, heat pump, oven, and water heater, it may be Tuesday.
Troubleshooting Map
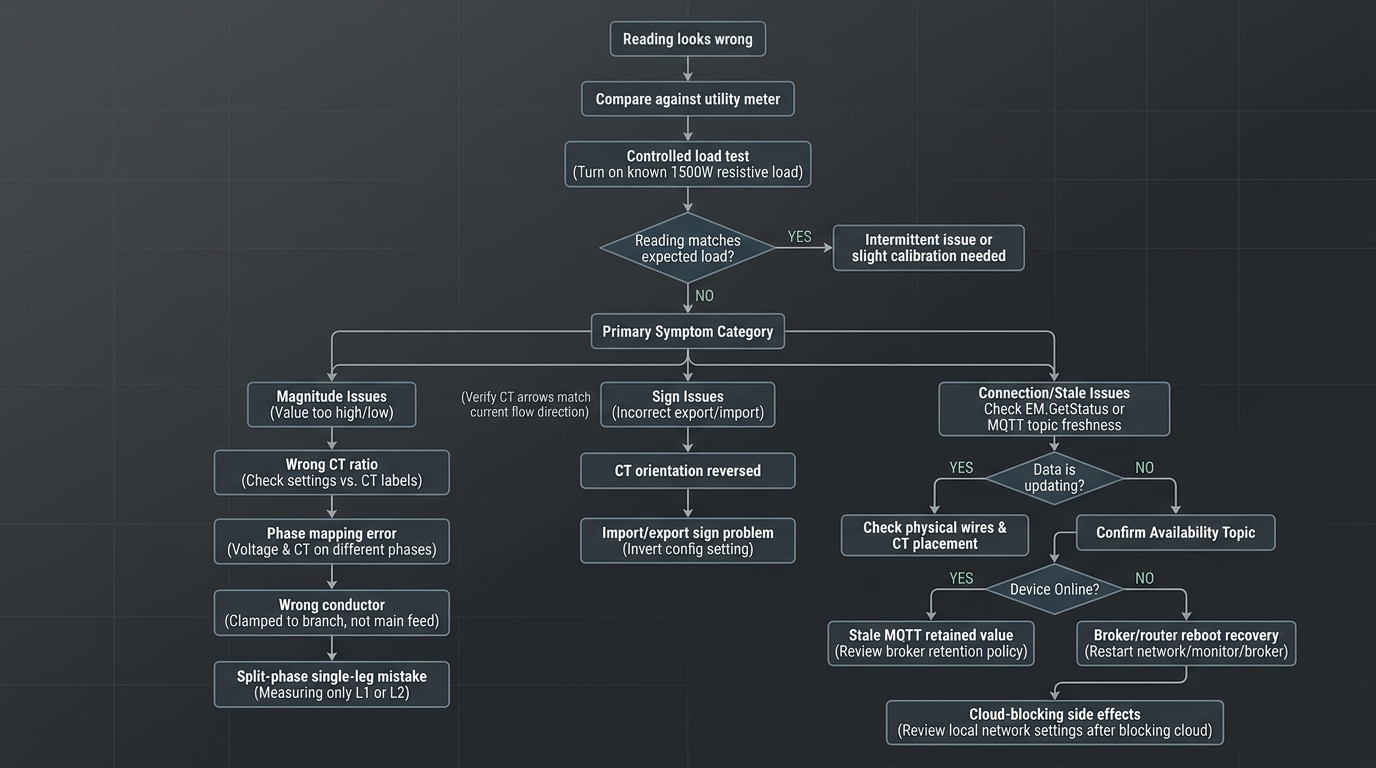
Use this map before changing configuration randomly. A whole-home monitor has several failure domains that look similar from a dashboard: measurement wiring, CT direction, phase mapping, retained MQTT data, router recovery, and cloud-blocking side effects. If you change all of them at once, you are no longer debugging. You are seasoning the problem.
Failure Case: Values Are Plausible but Wrong
This is the failure that hurts because nothing looks broken.
Symptoms:
- standby load seems too low or too high
- turning on a known 1500W load changes the dashboard by 700W
- solar export appears as consumption
- one phase is always near zero
- daily kWh does not roughly match the utility meter
Likely causes:
- CT clamp on the wrong conductor
- CT orientation reversed
- wrong CT ratio configured
- split-phase measured as single-channel
- phase labels swapped
- accumulated import/export mixed into one entity
Test with controlled loads. Turn on a resistive load with a known rating, such as a space heater, kettle, or hair dryer, and watch the expected phase. Do not use a variable-speed heat pump as your first validation load unless you enjoy chasing ghosts in a graph.
Then compare daily energy against the utility meter over several days. It does not need to match perfectly. It does need to be directionally sane. If your local meter says 18 kWh and the utility says 31 kWh, do not publish a dashboard screenshot. Fix the measurement.
Failure Case: MQTT Works Until the Router Reboots
Symptoms:
- meter appears online after manual restart
- after router or broker reboot, values freeze
- Home Assistant keeps old retained values
- MQTT availability is missing or always online
Fix:
- use static DHCP reservations or fixed IPs
- configure MQTT birth/will messages where supported
- make Home Assistant sensors expire
- avoid retained live power values unless freshness is explicit
- restart-test the broker, router, and Home Assistant before trusting the system
The restart test is not optional. Houses lose power. Routers reboot. Someone will update firmware at the worst possible time because apparently that is also a law of physics.
Failure Case: Cloud Blocking Breaks the Meter
Some devices behave cleanly with cloud disabled. Others log noise, flash LEDs, delay DNS lookups, or keep retrying outbound connections like a toddler asking “are we there yet?” every twelve seconds.
A sane local-first network policy is:
- allow local DNS to your resolver
- allow local NTP
- allow MQTT to the broker
- allow Home Assistant or poller access to local API
- block arbitrary WAN
- temporarily allow vendor update endpoints only during intentional firmware maintenance
If the meter requires internet to produce local readings, choose different hardware for this architecture. Optional cloud is fine. Mandatory cloud is the thing we are avoiding.
Security and Maintenance
Treat energy meters like infrastructure:
- set a local admin password
- disable cloud pairing if not used
- keep firmware update windows deliberate
- document IP address, CT mapping, breaker/panel context, and firmware version
- back up Home Assistant MQTT sensor definitions
- put the meter on a VLAN or at least a reserved IP with firewall policy
- monitor device availability
Do not expose the meter UI through port forwarding. If you need remote access, use WireGuard, Tailscale, or another private access path. “It only shows power data” is not a security model. It shows occupancy patterns, appliance behavior, EV charging habits, and sometimes enough timing information to infer when the house is empty.
What I Would Build
For a real whole-home article build, I would use a Shelly Pro 3EM class device when the panel and service type justify it, Ethernet if possible, MQTT into Home Assistant, and InfluxDB/Grafana for long-term analysis. For a cheaper hacker article, I would bench-build the ESP32 plus PZEM version first, prove the firmware and telemetry path, then hand the panel side to an electrician or keep it as a lab-grade subcircuit monitor.
The DIY path teaches more. The DIN rail path fails less. Pick based on whether the article goal is education, permanent monitoring, or both.
Official Docs Worth Reading
- ESPHome PZEM-004T V3 sensor: https://esphome.io/components/sensor/pzemac/
- Shelly Pro EM-50 knowledge base: https://kb.shelly.cloud/knowledge-base/shelly-pro-em-50
- Shelly Pro 3EM knowledge base: https://kb.shelly.cloud/knowledge-base/shelly-pro-3em
- Shelly Gen2+ RPC protocol: https://shelly-api-docs.shelly.cloud/gen2/General/RPCProtocol/
- Shelly EM API component: https://shelly-api-docs.shelly.cloud/gen2/ComponentsAndServices/EM/
Keep reading
Related guides
AI Energy Management With Home Assistant and EMHASS
Use EMHASS with solar forecasts, dynamic tariffs, EV charging constraints and deterministic Home Assistant fallbacks.
Build a Local AI Irrigation System With Soil Sensors and Weather RAG
Combine calibrated soil sensors, local climate history and guarded Home Assistant automations for private, water-aware irrigation.
Troubleshoot Modbus RTU to MQTT Inverter Readings
Fix silent RS-485 buses, wrong register values, stale MQTT topics, and Home Assistant sensor problems in inverter telemetry.