Build an ESP32 RS485 to MQTT Gateway for a Solar Inverter
Use an ESP32, RS485 transceiver, and MQTT to publish local inverter readings without buying a full industrial gateway.
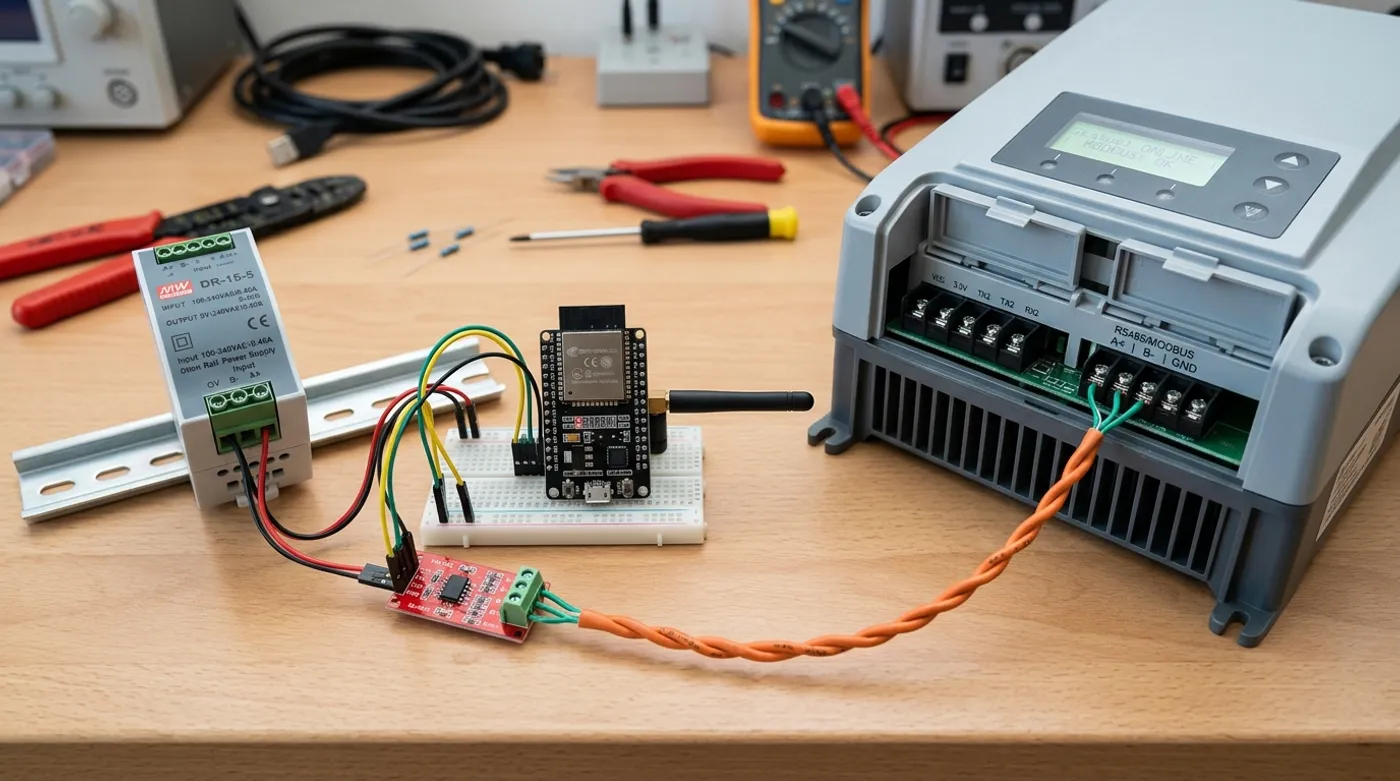
Use an ESP32, RS485 transceiver, and MQTT to publish local inverter readings without buying a full industrial gateway.
An ESP32 RS485 gateway is the cheap path into local inverter telemetry. It is also the path where people discover that “cheap” and “works every day in an electrical cabinet” are not automatically the same thing. The board can absolutely do the job, but only if power, wiring, polling, and MQTT reconnect behavior are treated like part of the design.
The SERP for Modbus RTU to MQTT has a GitHub firmware result for ESP8266, commercial gateway pages, and a Home Assistant thread about reading solar inverters locally. That tells you the demand is real: people want inverter data without a vendor dongle phoning home. The trick is not making the ESP32 the weakest link in the solar setup.
When an ESP32 Gateway Makes Sense
Use an ESP32 gateway when:
- the inverter exposes RS-485 Modbus RTU
- the inverter is not near your main server
- Wi-Fi is reliable at the inverter location
- you only need polling and MQTT publishing
- you are comfortable flashing firmware and reading logs
Use a USB RS-485 adapter or industrial gateway instead when:
- Wi-Fi is weak near the inverter
- the cabinet gets hot
- you need Ethernet
- uptime matters more than price
- you want less tinkering and fewer tiny wires
Yes, the ESP32 is powerful enough. No, that does not mean it belongs loose in a cabinet powered by a suspicious phone charger.
Hardware Layout
Baseline parts:
- ESP32 development board
- RS485-to-TTL transceiver module
- 5V DIN rail power supply or stable USB power
- twisted pair cable to inverter RS-485 A/B
- optional 120 ohm termination resistor
- enclosure or DIN rail case
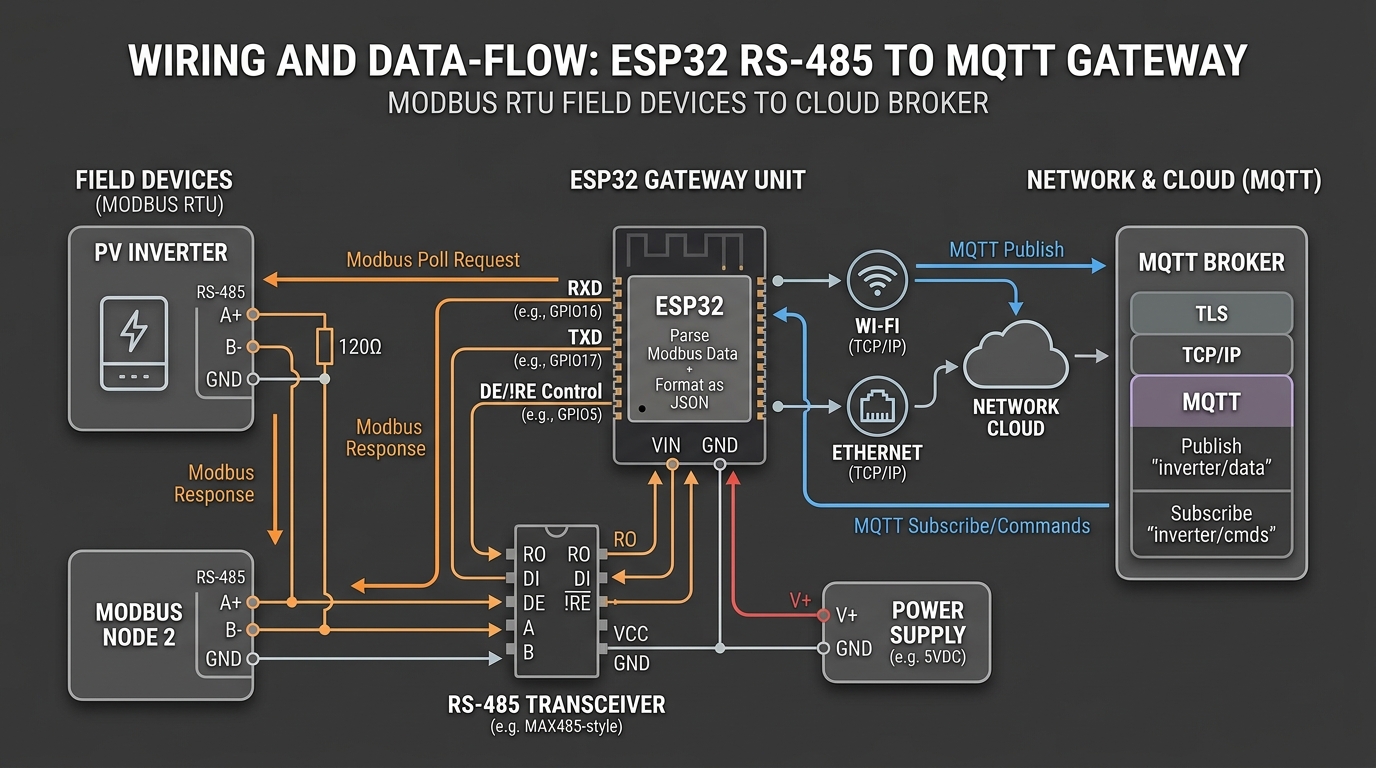
Wiring concept:
Inverter A/B
  -> RS485 transceiver A/B
  -> transceiver TX/RX/DE/RE
  -> ESP32 UART pins
  -> Wi-Fi
  -> MQTT broker
  -> Home Assistant
Typical ESP32 UART wiring:
ESP32 GPIO17 TX -> RS485 DI
ESP32 GPIO16 RX -> RS485 RO
ESP32 GPIO4      -> RS485 DE/RE control
GND              -> RS485 module GND
5V or 3.3V       -> module VCC, depending on module
Check the transceiver module voltage. Some modules are 5V. Some are 3.3V. Some listings are optimistic in the same way a used car ad is optimistic. Verify before feeding the board.
Firmware Shape
Whether you use ESPHome, custom Arduino firmware, or another Modbus-to-MQTT project, the logic is the same:
- connect Wi-Fi
- connect MQTT
- poll Modbus registers
- convert raw values
- publish MQTT topics
- retry without crashing when anything fails
An ESPHome-style configuration is attractive because it keeps YAML readable and integrates neatly with Home Assistant. A custom firmware path gives more control over odd register maps and payload structure.
Example MQTT topic plan:
solar/inverter/state
solar/inverter/pv_power_w
solar/inverter/battery_soc_percent
solar/inverter/grid_power_w
solar/inverter/debug/last_error
Always publish a health topic. A dashboard with old values is a liar unless it also tells you when the last successful poll happened.
Polling Strategy
Do not hammer the inverter. Modbus RTU is a shared serial bus, not a database endpoint with feelings.
Reasonable starting point:
- fast-changing power values: every 5 to 10 seconds
- battery SOC: every 15 to 30 seconds
- daily yield: every 60 seconds
- static model information: once at boot
Group adjacent registers into one read where possible. Reading ten adjacent registers once is cleaner than ten separate reads. Your inverter may tolerate noisy polling, but “it did not crash during my five-minute test” is not a benchmark.
MQTT Payloads
Use retained messages carefully. Retaining the last known PV power can make Home Assistant dashboards look populated after restart, but it can also make stale data look current. For live power values, include a timestamp or a separate availability topic.
Example availability:
solar/inverter/availability = online
solar/inverter/last_success = 2026-06-29T18:30:00Z
For Home Assistant, publish discovery only after the values are stable. During early testing, manually define sensors or subscribe with:
mosquitto_sub -h 10.20.0.20 -t 'solar/inverter/#' -vNothing humbles a person faster than discovering the “broken inverter” was just a typo in the MQTT topic.
Failure Case: ESP32 Reboots When the Inverter Polls
Symptoms:
- ESP32 boots
- Wi-Fi connects
- first Modbus poll starts
- board resets or disappears
Likely causes:
- weak power supply
- RS485 module drawing more than expected
- bad ground reference
- electrical noise near inverter cabling
- firmware watchdog triggered by blocking serial code
Fix:
- use a stable 5V supply
- shorten and clean up wiring
- move the ESP32 away from high-voltage conductors
- add logging around the polling call
- avoid long blocking loops
- test the same firmware on a bench with a short cable
If a random USB charger from a drawer is powering your solar telemetry, the system is not “local-first.” It is “hope-first.”
Failure Case: Wi-Fi Drops Near the Inverter
Inverters and electrical cabinets are not famous for being kind RF environments. If the ESP32 is mounted behind metal, near power electronics, and at the far end of the house, Wi-Fi issues should surprise absolutely nobody.
Symptoms:
- MQTT availability toggles
- data freezes for minutes
- ESP32 is reachable only with cabinet door open
- RSSI is terrible
Fix:
- move the antenna outside the enclosure
- place the gateway closer to an access point
- use a better ESP32 board with external antenna support
- reduce publish frequency while testing
- consider Ethernet or a commercial gateway if the location is hostile
This is where a wired gateway starts looking less overpriced and more like an adult decision.
Failure Case: Modbus Reads Work on USB Adapter but Not ESP32
If a USB RS-485 adapter works from a laptop but the ESP32 does not, the inverter is probably fine.
Check:
- UART pins match firmware
- TX/RX are not reversed between ESP32 and transceiver
- DE/RE direction control is correct
- module voltage matches ESP32 logic
- baud rate and parity match the known-good test
- A/B wiring is identical to the USB adapter test
Direction control is a common culprit. RS-485 is half-duplex. The transceiver needs to switch between transmit and receive. If your firmware leaves it in transmit mode, it will shout into the bus and then act shocked that no one answered.
Failure Case: Home Assistant Shows Old Values
This is usually an MQTT freshness problem, not Modbus.
Fix it with:
- availability topic
- last successful poll timestamp
- Home Assistant
expire_afterwhere appropriate - no retained live power values unless you really want them
- a separate
debug/last_errortopic
Example Home Assistant sensor:
mqtt:
  sensor:
    - name: "Inverter PV Power"
      state_topic: "solar/inverter/pv_power_w"
      unit_of_measurement: "W"
      device_class: power
      state_class: measurement
      expire_after: 60
Now stale data dies instead of pretending the sun is producing 3 kW at midnight. Small improvement.
When to Stop Using the ESP32
The ESP32 gateway is great when it is stable. Stop forcing it if:
- Wi-Fi is unreliable
- the cabinet is too hot
- power is unstable
- the household depends on the data for load control
- you need multiple Modbus devices and stronger isolation
At that point, use an Ethernet Modbus gateway, a small Linux host with USB RS-485, or an industrial Modbus-to-MQTT gateway. The point is local telemetry, not proving that the cheapest board can survive every bad environment.
Keep reading
Related guides
AI Energy Management With Home Assistant and EMHASS
Use EMHASS with solar forecasts, dynamic tariffs, EV charging constraints and deterministic Home Assistant fallbacks.
Build a Local AI Irrigation System With Soil Sensors and Weather RAG
Combine calibrated soil sensors, local climate history and guarded Home Assistant automations for private, water-aware irrigation.
Troubleshoot Modbus RTU to MQTT Inverter Readings
Fix silent RS-485 buses, wrong register values, stale MQTT topics, and Home Assistant sensor problems in inverter telemetry.